Why is it Important to Correctly Prepare the Graphics?
If the graphic elements can be supplied in way that makes it easier for an animators to use straightaway, then it can save whole days worth of animation time. An animator’s time can be wasted by having to wade through unfamiliar/unorganised Illustrator files, converting file formats, picking through thousands upon thousands of unlabelled layers, and generally having to re-build graphics from scratch.
None of this stuff is complicated, but when there is a lot of it, then it can accumulatively add up to quite a lot of lost time. Therefore, If you’re a graphic designer, and if you’re able follow these simple concepts and rules, then you shall become an After-Effects-er’s new best friend, forevermore!
Files
Colour Mode
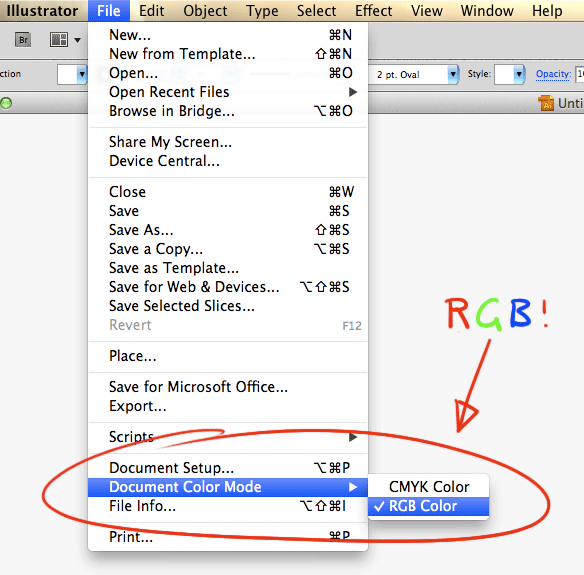
Files should be in RGB colour mode, and not CMYK.
CMYK is for fancy-pants print work, and is not suitable for animating with!
File Format
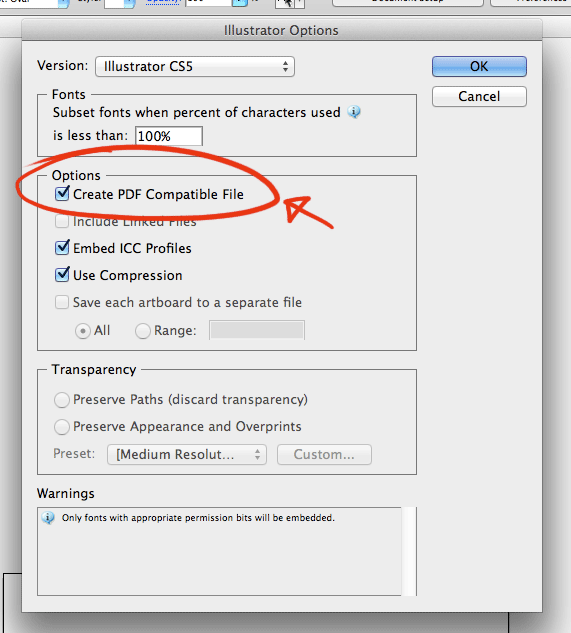
Files should be saved in Illustrator’s own .ai format, with PDF compatibility turned on.
Don’t put everything into one huge mega file!
Split everything sensibly into separate, smaller, more manageable files. This is for the following reasons;
- It makes it easier for an animator to find the necessary elements, and work with them.
- If necessary, It’s much easier to make small edits to the graphics later on in the project, without totally wrecking the animation.
- If a file becomes corrupt, then at least it’s only that one graphic element that gets fried, and not all the elements in the whole project. It does happen! Think of, “eggs”, “baskets”, and “putting in”.
File Organisation!
Files should named and organised according to their purpose, eg; “user_interface_elements.ai”, or “map_timbuktu.ai”. They should be placed in the relevant folder, eg; “…/shot_xxx/elements/…”.

Linked Files
The links will break when Illustrator files are swapped between Macs and PCs. Try to embed them, or even better, don’t use them at all! Or at least, not for graphics intended for import into After Effects. A much better option is to provide the associated files separately, and then they can be imported and composited directly in After Effects.

Multiple Artboards
Multiple artboards are excellent for storyboarding, and trying out different ideas, but from an After Effects point of view, they can be a bit of a nightmare to work with. It’s much better to put things into separate, well organised files, as opposed to just handing everything over in one huge impenetrably tangled mass of stuff (also, see above, “Don’t put everything into one huge mega file!”).
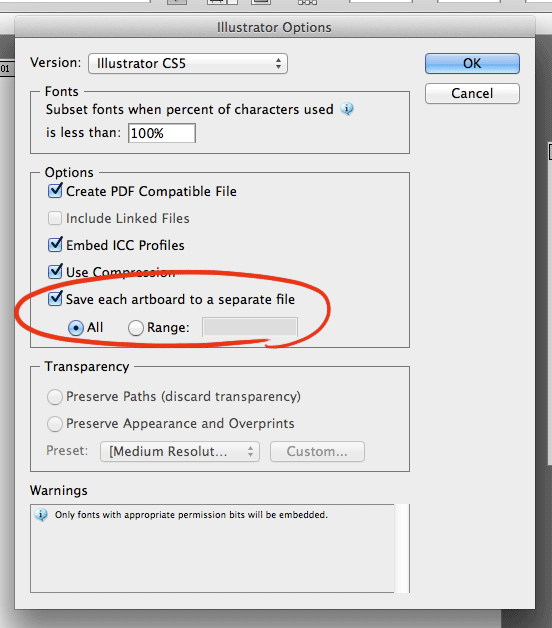
You can use the “Save each artboard to a separate file” option in the Save dialogue to help quickly split up your artboards into separate files.
Don’t fiddle with Illustrator files that are already being used in After Effects!
Unless you really know what you’re doing. Minimal colour alterations, if done VERY carefully, can be ok. The slightest dimensional change, however, (eg; position, scale, rotation, anchor, etc) can destroy weeks of delicate After Effects work. Don’t do it! Unless you want to make the After Effects person cry.
Layers
There are some differences in the way layers work, between After Effects and Illustrator.
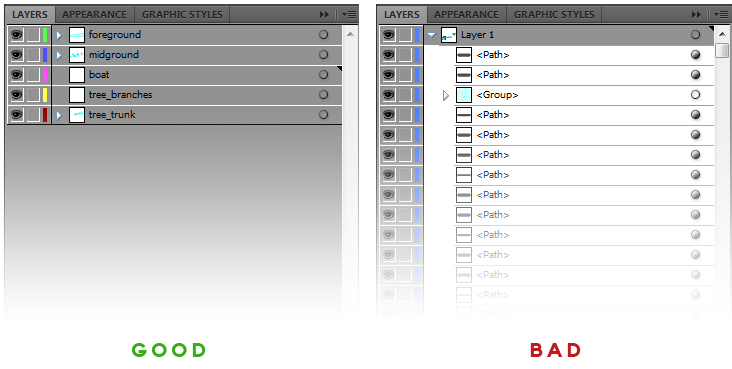
The most obvious difference, is that After Effects will only see the top-level layers of an imported Illustrator file. After Effects won’t see the nested layers in the composition timeline; These will all be flattened into a single layer.

Consequently, anything that needs to be animated as a seperate elements, must to be in a suitably named top-level layer of it’s own. It should not be nested away somewhere.
Layers need to be sensibly named and well organised
This can help prevent many wasted hours of poking around to find the right elements.
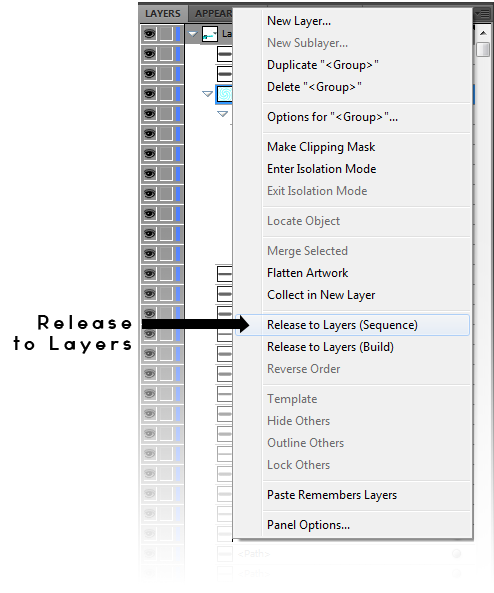
Release to Layers
You can use the “Release to Layers” command to quickly arrange a large amount of nested elements into their own layers.
Layer Effects
Remove all layer effects, eg; drop shadows, blurs, glows etc. These work better when created and manipulated directly within After Effects.
Delete Unnecessary/Obsolete/Empty Layers
Thanks!
Clipped bitmaps
These seem to confuse After Effects, and generally cause lots of grief. A much better, cleaner, option is to provide the necessary bitmaps as separate files, which can then be masked and composited directly in After Effects.
This can also be an issue if you’re intending to use bitmaps to add a bit of texture to graphics. In these cases it’s usually better to use Photoshop to create the elements, rather than Illustrator.
Anything bitmappy and textured should really be going through the Photoshop route anyway.
Maps and Diagrams
When designing maps and backgrounds, it’s always really useful to provide more material than just that shown within the camera frame. Remember, in animation, everything moves! Therefore, the wider parameters we can have to work within, the better.
- Don’t put important annotations too close to the frame edge.
- If we need to pan and zoom the camera, provide enough extra material for us to move around in without revealing the edges
Icons and Logos
Logos needs to be in vector format, or hi-res bitmaps with alpha channels. They also need to be in RGB format, not CMYK.
Text
If at all possible, text should really be approved and signed off, before any real animation work can start on it. The amount of text can be a critical influence on timings. A viewer needs to have enough time to read any onscreen text, and consequently this will effect animation and editing decisions. For this reason, text can be a difficult thing to change afterwards.
Also, try to spell things correctly before handing over to animators.
Fonts
Make them available please! I prefer OpenType/TrueType fonts, because they are compatible with both Macs and PCs. Mac-only fonts are not very useful for those of us on PCs.
Size of Graphics
Don’t make them too small! If necessary, It is possible to vectorise and scale up graphics inside After Effects, but this does accumulatively add to processing time, and it can sometimes cause glitchy, flickery problems with masks, effects, and render ordering.
We need bear in mind the size and shape of the intended media, and work to that. For example, a HD TV screen is 1920 x 1080 pixels. Graphic elements need to be scaled and proportioned to accommodate this. It can often be helpful to make graphics slightly larger than necessary.
Where possible, try to keep everything consistently proportioned.
Paths
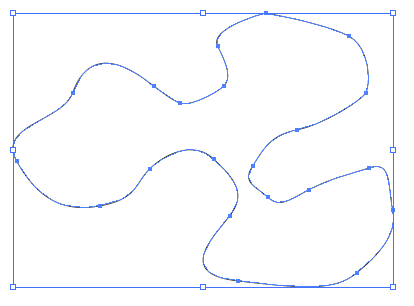
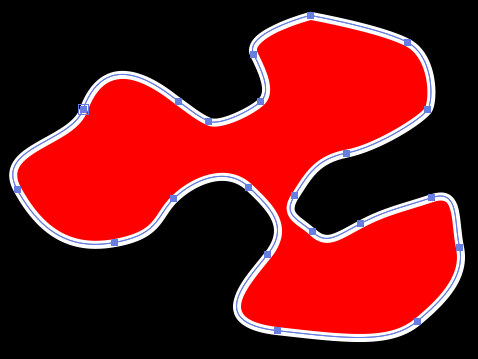
Sometimes we will want to copy and paste paths directly from Illustrator, into After Effects. This is particularly useful for the following reasons;
- This will allow us more flexibility in animating the graphics, using shape layers
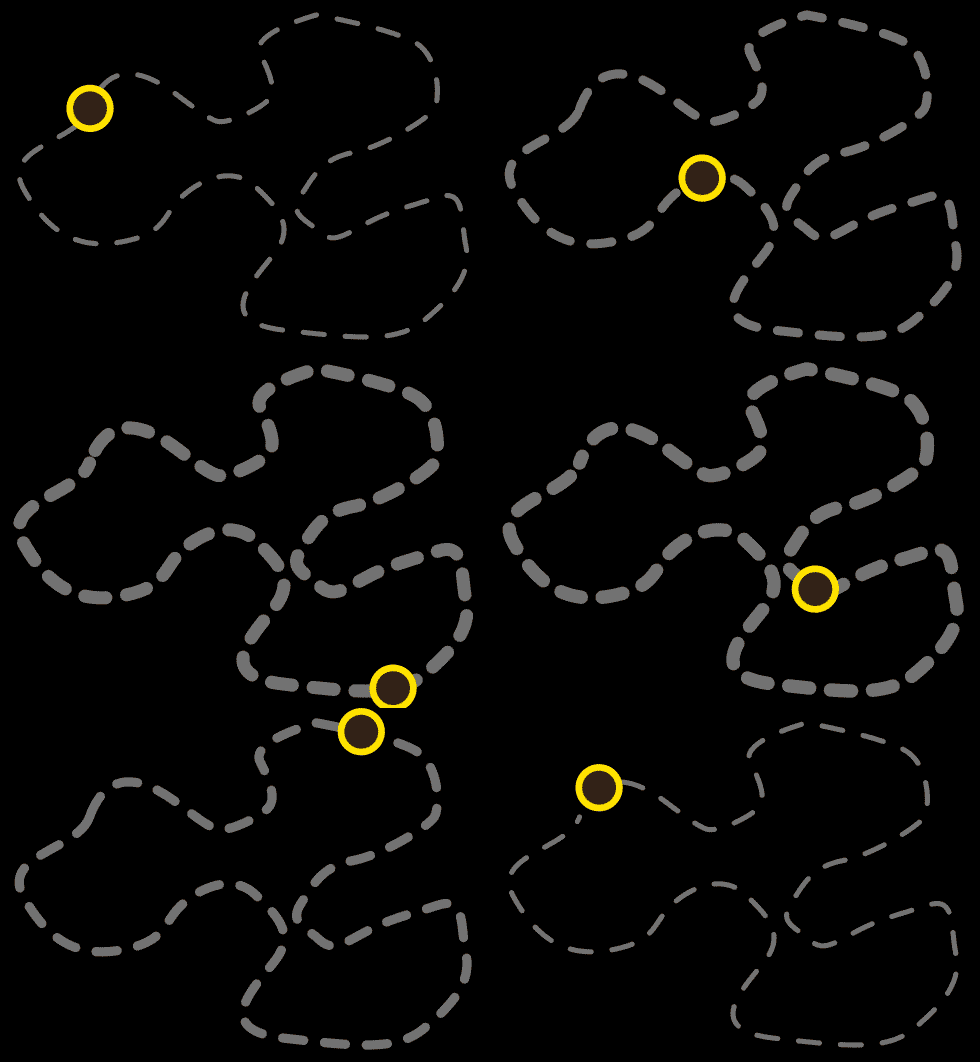
- We can use the path as a “tram-line”, for moving things along.
- We can animate the line strokes “drawing” on.
- We can control stroke width directly within After Effects (useful for zooming into maps, etc), as well as many other animatable parameters.

Safe Frames
Safe frames are an annoying legacy from analogue television, and unfortunately, they still haven’t quite faded away into history yet. TV broadcast companies can be religiously strict about them.
So we do need to be, at least aware of safe frames, especially for any media that might potentially be shown on a television set.
Safe frames are, of course, less relevant for media intended for web, computers, mobile, and bespoke devices.
Conclusion
I hope this post is useful. Any comments, good or bad, will be muchly appreciated. Is there anything I may have missed?
Hi James,
Thanks tremendously for your quick and readable overview. I’m a professional graphic designer, and just got my first small after effects assignment. I spend a lot of time making a test, to make sure I could deliver my client what he asked for. Now I wanted to pick it up and noticed that all my illustrator links are lost. After reading you post I at least know how to make a good new start…
Thanks! Glad you found it useful
Yes, finally! I’ve been looking for an article like this for ages. You clarified a lot of questions I’ve had earlier, and made the preparations for my upcoming animation a whole lot easier. Great job on this one!
Excellent article, many thanks. The “Release to Layers” was especially helpful.
I’m hoping to find out why colors vary when importing AI files into After Effects. Even if the original AI is in RGB format, the colors always end up more saturated in AE. Lowering the saturation doesn’t exactly fix it.
Any pointers would be lovely!
I’m not sure what could be causing your colour variations. I suspect it might be a colour management issue though, which is a whole huge subject in itself!
Two things you could try (if you haven’t done so already);
*Check your Color Settings under Edit > Project Settings. See if changing your Color Working Space will help?
*Under Interpet Footage settings, see if changing your Color Management settings here will make any difference?
That’s all I can suggest for now, but this will give you much more in-depth detail than I can (again, if you haven’t already been through it!)
Thank you! I’ll share this with my clients. You touched on it, but my most frequent problem is clients laying out a 1920×1080 artboard with artwork extending past the edges. Perhaps I should send them an oversized template to start from. Multiple artboards are also a massive pain–I found your entry while searching for a solution for importing multiple artboards. (still looking)
Hi Greg. Thanks for your comment. I feel your artboard pain! Is this any help? http://www.jamesmerry.co.uk/home/?p=482
Yes! Thank you. I wasn’t aware of that. My issue this week is artwork (both AI and PSD files) that I modify greatly to prep for AE, only to have the client re-issue new artwork based on client feedback 2 days later! It’s basically like starting over, or having a Frankenstein as I extract out only modifications. I’m not sure what to do with that except try to get them to use my artwork when making changes–which can also be problematic for linking.
Thank you so much for posting this! It’s incredibly helpful in preparing an Illustrator to After Effects workflow!
Glad you found it useful! 🙂
This was a nice overview. I thought the sublayers in AI were flattened, and this confirmed it. I have had much trouble in AE rendering my Illustrator-file animations… and I spent a lot of time cleaning up the Illustrator files before importing them into AE… I am using a lot of Scribble however. I was hoping to find out if AE still recognized if paths were left open and if too many vertices fries its brain a bit… I’m troubleshooting right now to try and figure out why it’s getting stuck. I’ve gotten “Scribble Error” and “not enough memory” messages when the render stops.
Thank you for an excellent article!
Thank you so much, this was a big help.
Good man James, great read. Your layers and paths sections will come in very handy alright.
I’m looking for advice on CS6 Photoshop and Illustrator Vectors. Which is better for use in After Effects and why? For the most part I will be creating showcase videos for mobile Apps. So this means zooming in and out and animating the Apps User Interface.
I have being using AI with AE for the past year and I am happy with the results but the designers who make the Apps are more comfortable using Photoshop. I haven’t used the Vector capabilities in Photoshop so I am a little hesitant to work with it. What do you think?
THANK YOU. You just explained a lot of what I wanted to know.
Keep up the good work
Hey! James!” great post buy i´ve an enquire. It is possible to import the text from illustrator to AE and keep it editable? Thanks
Hi Camilo. Sorry for the slow reply. Yes, you can just copy and paste text from Illustrator into a text field After Effects, and it will be editable.
The newer version of After Effects CC also has some improved options for importing Illustrator assets, than what I have covered above (which was written with CS5 in mind). I should probably update this post when I get the time!
Hi James… I’m wondering about your “Don’t Fiddle with Illustrator files that are already being used in After Effects!” section. We’ve taken over a project done by another production house that has dozens of ai files pulled into after effects. We need to change the ai artwork now, and every time we do the keyframed positions, anchor points, etc get out of whack. Even with a simple fill change. Why is this? And what do we need to know in order to work around it? Currently working in CS6, tried importing it into CC version of AI and AE, but no luck. Thanks.
I use HD template for my ai files, my paths are bigger than the frame to animate them but when I import it AF cut it to the HD size… Is there any chance to import it with out making every thing smaller in AI? Thanks
Hi Pedro. If I understand the question correctly, then the easiest way around this is probably to just increase the size of the artboard in your Illustrator file so that your graphics aren’t cropped. You can then crop down to HD size once you’re inside After Effects.
Argh, that can be a hard one to come back from, and it’s exactly the sort of thing that makes me want to go on a murderous rampage. Personally, in this situation (after I’ve finished the murderous rampage) I would normally just cut my losses and re-import the Illustrator file afresh and start all over again. Sometimes Illustrator files can be too large and complicated to really know what is going on, and what is effecting what. Which is why I usually find it easier to spin all my graphic elements out into separate files before I start animating them. At least that way you can go back and edit them in Illustrator without effecting the other elements.
Sorry this probably isn’t a lot of help for you!
Thank you so much for the article! I find this very useful since I always had thoughts on how risky to put every single storyboard in a single file. Now I know how to handle them properly.
THANKS AGAIN!
Really useful, clear and informative article. Thanks for sharing 🙂
Hi there. Thank you for the great post. I have also been assigned my first AE project and I am working in AE cs6. I have created an animation in AE before but that was ages ago and it was a personal project and it was never on show anywhere. I am a bit confused about choosing the correct composition size. This 2d animation will be shown on a large LCD screen in a hotel lobby plus on the hotels exclusive channel on the tv’s inside every room. Its a commercial.
Would appreciate your help
Thanks. very interesting.
I will write my own (french) version.
Hi James,
This was very interesting, I am both an Illustrator and now an animator / compositor but am just starting to combine the two and make a little cartoon using Puppet Tools. I wonder… when importing from Illustator, which is better, Import as ‘Layer Size’ or ‘Document Size’?
Regards,
Joel
Hi Joel, I guess that’s one of those personal preference things really. Me, I usually prefer to import as ‘Layer Size’, because I don’t like having to deal with graphics with huge expanses of empty pixels. There can be reasons to import as ‘Document Size’ too though, eg; if you want all your graphics to maintain their positions within the frame. Hope that helps!
Good article! I will probably use it as a reference to give illustrators who I work with.
I just recently wrote a couple of Illustrator scripts to help my Ai-to-Ae workflow since I so often received single layer files.
http://seblavoie.com/scripts/illustrator-to-after-effects-workflow-helper-scripts
Great article, definitely clarified afew points.
Illustrator is still difficult for me. Thanks for the tutorial. Please give a review also for my desain logo blog
Hey great article but I am not able to import my illustrator work as compositon – retain layers. the option is locked on footage! Ive made sure that the AI. file is in layers and RGB. Help would be appreciated.
Really great article. Got all my illustrations done and needed to know how to format them for animation. so helpful.
Thnks a lot…very clear and helpful!
Hi James,
I am using Cartoon graphics from Illustrator to create the drawn on whiteboard looking animation in After Effects. My question is there a ratio from the illustrator stroke width. I am using a stroke thickness of 11 in illustrator but can only bring the path and not the stroke. when i set the AE stroke effect on i cannot get it to line up quite like my mask did in AI.
Thanks,
mike
Fantastique!
Thanks James, this has really helped at 11.50 on a Friday night on a tight deadline.
Glad it helped! 🙂
Some extra context on some of this would be awesome! Like you warn to be aware of safe frames, but don’t explain what they are. 🙂
Good point. This is quite an old post now, and I should probably get round to updating it at some point. Safe-frames are an annoying relic from the analogue TV era. They don’t matter so much for anything not intended for TV broadcast (eg; web), but TV companies tend to be very strict about them. I might do an angry-ranty post about safe-frames one day!
Thanks for this James… Wish I’d thought this logically before!
Tremendous article. Was looking for clear explanation for a newbie friend. Terrific! Thank you for writing and sharing it!
Thanks! 🙂
still i could not do it.
My Ai file is getting imported as a single image, i use After effects cc 2015
best guide ever.! It was readable.! I read almost 98% of the article. (Something I usually don’t do in other sites.!)
Keep up the good work.
Thanks! 🙂
Seriously, this is GOLD!
Hi James,
I’m looking to create a series of light rays boucing around the inside of a reaction vessel for a short animation, ultimately for a demo video. The last animated sequence in yours ‘Paths’ section demonstrates the effect I’m going for and I was wondering if you could share your process in developing that please? As the yellow line runs around the stroke it fades out as it travels and I’m struggling to master this look!
Any feedback gratefully received.
Thanks,
Helen
4 years later and it’s still so helpful !
Great! Some of the info is definitely a bit dated now, but glad it’s still useful!